Wednesday, 31 October 2012

Free papers from Magazine

Good Morning

I hope you are all well and not too cold today. Today I would like to share with you a couple of Christmas Cards I have made using the free Forever Friends decoupage and paper stack with came with this months Papercraft Essentials. Now I have to confess when I get free papers , toppers and things with magazines I tend to put them aside 'for later'. How many of you do the same?
But with this pack I just had to have a go at making the toppers up and then making actual cards with them! The stack gives you 10 patterned papers and 2 designs each of four decoupage designs.

This first card is a 6x6" card blank. the decoupaged topper was placed onto white pearlesent card and then onto red card stock. The corners were then trimmed with a corner punch. I  then used the green swirly paper down the left hand side and the cream holly paper on the rest of the card. This was the matted onto red card stock, but if like me you cut the papers a bit too short, I wrapped a piece of green satin ribbon around the bottom ! The holly spray was cut with a Marrianne Die and then I added red holly berries with Xmas Red Stickles. Three red gems top left and bottom right of the card.


For the second card I again used the green swirly paper. This time I cut a square of the red checked paper and edged it with Festive Berries Distress ink. The decoupage topper was then put on white card and then onto red card. I rounded the corners with my small corner rounder punch.  A small snowflake peel off in each corner  added a bit of bling to the card.


I hope you enjoy using your freebie goodies as much as I have.


Thanks for stopping by. 
I appreciate all comments you may have on my cards.

Gill


Tuesday, 30 October 2012

Lili of the Valley

Good Morning

Today I would like to share with you the images which we coloured during the fantastic workshop with Bev Rochester at Lili of the Valley on Saturday.

The first image was Aimi with Lantern. When I first saw the image I have to admit my heart sank, when I saw all the small areas of different colours on the dress, flowers and her fan. I didn't see just how I could get an image as good as Bev had. However with her expert teaching and taking it one step at a time this is my finished result. Please ignore the scribbles around the edge of the image, I was trying to change the colour of my promarker fine nibs :) 


This second image is Teddy with Robin. I didn't think we would actually get round to colouring this image in as Aimi took so long to finish. The little bear was coloured in browns and then the robin was coloured in. He is relatively quick to colour and such a cute image.When we had finished colouring him in with Promarkers we then went over with prisma colour pencils and used a blending stump and sansador. I can't tell you how much this last short process changes the images and makes them so much more professional looking.
If you ever get the chance to attend one of Bev's workshops GO GO GO.


I will try and get these images made up into cards soon :)


Thanks for stopping by. 
I appreciate all comments you may have on my cards.

Gill


Monday, 29 October 2012

Massive Crafting Session!

Good Morning

Toady I would like to share with you a few of the Christmas cards I made during a marathon session last Friday.  I will be attending a Christmas Craft Fair in Stockport in November and I am selling some of my cards. The Craft Fair is to raise money for Francis House Children's Hospice.


I found in my stash a Lisa Bearnson Holiday Card Kit, which I bought quite a few years ago and have never used. So as each card was in individual bags, it was just a case of putting them all together. There were six of each design so I sat all afternoon and I made up 60 cards. When I made the first card up to the instructions I then tweaked them to make them my own, and added the essential glitter! Even if they only sell for £1 each the money will go to a very good cause.


Thanks for stopping by. 
I appreciate all comments you may have on my cards.

Gill

Saturday, 27 October 2012

Christmas Again

Good Morning 

Today it's back to Christmas cards. 

For this first card I have used a 7x5" card blank.  The paper, I think, is from a DO Crafts paper stack, is a gorgeous lilac swirly paper. The topper is a Forever Friends Die cut Pyramage which I have mounted onto white card which has been die cut with Marianne Die, Petra Ovals. Then whilst still in the die, I have gently inked the embossed areas with Festive Berries Distress ink. The sentiment if from the Die cut pack, again inked on the edges with distress ink. Three red gems top right and bottom left add that touch of bling without being over the top.


For this second card I have used another paper out of the same pack. This time a white paper with shades of purple and lilac snowflakes on it. This topper is a die cut decoupage from the same pack. I have layered this onto purple Bazzill card, as I have with the sentiment. Again I have added gems which had been coloured with alcohol ink to match the colours of the card. This time I graduated the sizes of the gems.

Thanks for stopping by. 
I appreciate all comments you may have on my cards.

Gill

Friday, 26 October 2012

Seasonal Cards

Good Morning

Today I would like to share with you a few more seasonal cards.

This first card was made using the First Edition Desert Bloom paper stack. This time I have used the papers with the pinkish tones in them. This was very simply layered with burgandy card stock with some of the layers having the corners trimmed with a corner inverter punch. A length of burgandy satin ribbon was tied around the right hand side of one of the panels. A glitter sticker from the Simply Creative range was stuck to the top panel. As I couldn't find gems to match this colourway I simply used clear gems and coloured them with alcohol inks.


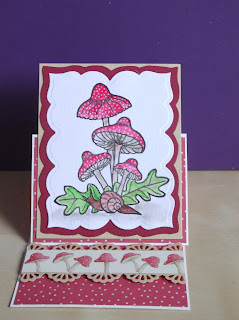
The card was made as an Easel card. The papers were taken from the Neighbourwood paper range. The stamp is a Clarity Stamp which was coloured by watercolouring with Marvey Le Plume pens. The white spots on the toadstools were then added using a white gel pen. The image was then die cut using nesties Labels 23 and then layered onto a piece of deep red cardstock. The stopper was made from beige card and the edges were punched using an EK Success border punch on both side of the card, this was attached using foam pads to raise it up off the card and help to stop the card from falling flat.


Thanks for stopping by. 
I appreciate all comments you may have on my cards.

Gill

Thursday, 25 October 2012

Tando Gothic Arches

Good morning

Today I would like to share with you 2 chipboard Gothic Arches which have been decorated.
These two were done during a workshop at The Stamp Pad in Greenfield. They are not something which I would normally have picked during my crafty stash shopping.
I have found that sometimes by doing a workshop

For this first one, the inside panel was painted with a metallic green paint and then stamped on with Black Archival ink. The outside of the panel was painted with 'glue and seal', or you could use Indigo Blu's Flitter glue, then a sheet of gilding material. This gives a smooth covering and if you have varigated foil looks fantastic. If you don't have the foil sheets you could use the normal guilding flakes, although this would give a slightly different finish. Assemble the inner and outer pieces together and then turn over and back with patterened paper.

For the second panel was inked in pink and then stamped over with a great script stamp by Stampendous. The inside panel was covered with a matt medium. Into this we stuck metal swirls, small jump rings, any small metal bits you may have lying around. This was then covered with either glue or matt medium.  Then we took a sheet of tin foil (regular kitchen variety) and scrunched  it up. This was then gently laid flat with out pulling all the crinkles out, over the center piece with all the metal findings on. Gently we then rubbed the foil into the metal pieces so that they were raised up under the foil. We then covered the piece with black acrylic paint left it a few minutes and then gently wiped it back. I then went over this with a metallic pink paint. The assemble as before and back with patterned paper.


All the goodies to make these projects were bought from The Stamp Pad in Greenfield.


Thanks for stopping by. 
I appreciate all comments you may have on my cards.

Gill

Wednesday, 24 October 2012

Autumnal Cards

Good morning

Today I would like to share with you a couple of cards which I made at a recent workshop with Gwen at The Stamp Pad  in Saddleworth.

These two cards were made with papers from the fabby First Edition Desert Bloom paper pad.

This card was made from a 6x6" card blank. The two papers were matted onto kraft brown card. Although it doesn't show on the photo very well the floral paper is glittered on the flowers and leaves. The stripe paper was then punched along both edges with a scalloped border punch (I think this one was by EK Success). Then cream and brown spotted Bo Bunny ribbon was tied around these layers. The Owl was cut using the GoKreate Owl die. He is sooo cute. He was matted onto a brown paper from the stack and Kraft card which have been die cut with Nesties lables 1. This was then attached using foam pad to raise it up slightly. The small acorns and leaves came from a small button pack, the shanks were cut off and then they were attached to the card with silicone glue.

This second card was also made using the same Desert Bloom Paper pad. This time the papers were matted onto brown card which has a slight glittery look to it. The right hand side of the brown glitter was punched with a border punch before being attached under the stripy paper. The ribbon was again by Bo Bunny, I love this spotty ribbon. The pumpkin in the centre was die cut with a Cuttlebug cut and emboss folder. Once the shape was cut out you then put it pumpkin into the embossing folder and this give the card its fabby indentations on the pumpkin and the leaves. This was finished off with mettalic brown pearls in the top left and bottom right hand corner. The sentiment is from a set by Craftwork Cards.


Thanks for stopping by. 
I appreciate all comments you may have on my cards.

Gill

Tuesday, 23 October 2012

More Christmas

Good Morning

Today I am going to share with you another two Christmas cards. These two cards are both 7x5" landscape cards.

This first card was folded tent fold (With the crease at the top)The paper came from an SEI Joyeux Noel paper pad. The Forever  Friends topper is a pyramage which is matted onto white card which had been die cut with the nesties scalloped oval die. This had been inked with Iced Spruce distress ink. The sentiment was put on with foam pads. This was finished off with three nailheads in the top right and bottom left corner.


The second card is also landscape. The paper comes from a Marianne Paper Pad. The Forever Friends Decoupage was matted onto gold mirri card as was the sentiment. This time I put three gems in the top left corner and then one in each corner of the main image. On the bottom left hand side of the paper I went over the flourish with a quickie glue pen and then just highlighted with glamour dust glitter.


Thanks for stopping by. 
I appreciate all comments you may have on my cards.

Gill

Monday, 22 October 2012

Christmas Fair Goodies

Good morning

Today I want to share with your a couple of goodies I have made for a Christmas Fair I am attending on 25th November 2012. The fair is to raise funds for Francis House Children's Hospice which is a hospice for children with life limiting illnesses. It is such a worthwhile cause and they bring so much joy to these children.

I have made some 'Snowman Poop'.

The red card was embossed using the cuttlebug snowflakes folder, Then cut to size (i found that for the normal sizes of Tic-Tac's 10.5 cm x 7cm was about the best size. The snowman image was printed from a free Whimsey Doodles template.
 Inside is the little rhyme which you can also print off from this site. A length of ribbon approx 9" long stuck along the middle ties the project together. These are great for children of all shapes and sizes (my hubby has already 'borrowed' some of my packets !

For the 'Grinch Pills' I have used the same idea. This time I have used green card stock but again I have embossed it with the cuttlebug snowflake folder.
 The verse and picture on the front I got from here . The verse reads:- Feeling kinda grouchy! Holiday spirit can't be found! Just try these 'Grinch Pills' They're the best medicine around. Whether eating a whole handful or munching one or two,These tasty little 'Pills' take the 'Grinch' right out of you!

So sorry that the photos are not the best, my camera is playing up.


Thanks for stopping by. 
I appreciate all comments you may have on my cards.

Gill

Sunday, 21 October 2012

More Christmas !

Good Morning

Today I would like to share with you another two Christmas Cards. I hope your not getting bored with these, but at the moment it's all that I am making.

Both these cards are made with 7x5" card blanks and using the 'Me to You' Tatty Ted decoupage range. 

This first card uses the bottom left hand corner of a Carol Wilson 12x12" scrapbook paper. The silver Mirri card was die cut on my Big shot using the Nestabilitie scalloped ovals die. The sentiment is from the die cut sheets and also matted onto silver mirri card.


This second card used the bottom right corner of the paper and then this was turned 180 degrees so that the snowflakes are in the top corner. Again the decoupaged topper was matted onto a silver mirri card which had been die cut with the scalloped oval die. Again the sentiment topper was matted onto silver mirri.


Thanks for stopping by. 
I appreciate all comments you may have on my cards.

Gill

Saturday, 20 October 2012

A Monochrome Christmas

Good morning

Today I would like to share with you a card which may end up being 'my' card this Christmas! I was playing with a Bauble Tree embossing folder by Couture Creations. I put through different colours and weights of card through my Big Shot using this folder.

To make this card I used a 5x7" card blank. The tree was embossed onto Pearl card. I then used my Quickie Glue Pen to highlight certain areas of the embossing and covered with Crystal Glamour dust. I then used a corner punch which nibbles a bit out of the corner (like a set of lips). This was matted onto black mirri card which also had the same corner punch used on it. I then put 4 small black gems on the card, one in each corner and then added a black greeting peel off.

The embossing folder, quickie glue pen, glamour dust, card and gems were all bought from The Stamp Pad, Saddleworth.


Thanks for stopping by. 
I appreciate all comments you may have on my cards.

Gill

Friday, 19 October 2012

Christmas Cards


Good morning

Today I have blogged another couple of cards made with Forever friends pyramage toppers.

This first card is a 5x7" card blank. The red snowflake paper is from a Papermania A4 pad. The base is a Gold mirri card which has been die cut on my Big shot using nestabilities deckle ovals. The message was matted and layered onto Gold mirri. Three gold nail heads top right and bottom left, the holly motif was die cut from green card using a Marianne Die. I then highlighted the berries with Red Stickles.

 This next card is one of my favourites (well today's anyway :) ) Again a 5x7" card, the paper is an old one from a couple of years ago ( I forget which designer, sorry). The pyramage topper was then matted onto a white card die cut. This was cut using the Marianne die Petra Ovals and then inked with Iced spruce distress ink. The card was finished off with three pearls in the top right and bottom left again.


Thanks for stopping by. 
I appreciate all comments you may have on my cards.

Gill

Thursday, 18 October 2012

Gothic Clock

Good Morning

Today I would like to share with you a project which I made on a workshop last weekend at The Stamp Pad in Saddleworth. The workshop was run by the talented Andy Skinner.

The project we made was a Gothic Clock, the basis of the clock was from  Tando Creative. The clock base was a good weight chipboard, and comes complete with the clock mechanism. I used part of a sheet of Graphic 45 paper cut into a circle to show through as a clock face.


The outer 'case' of the clock was embossed with an embossing folder ( I used one called heavy duty). This was then painted with a brown paint, over this we used a wash of red oxide paint. The 'rivits' are just circles of a heavyweight paper which were stuck on using a mat medium before we added the paint.
The cog was covered with Terra paint as was the clock hands to give them some texture.


The top black piece was embossed using a floral embossing folder and then painted with black acrylic paint. The numbers for the clock were also painted in black. To highlight all the raised embossed areas we rubbed over them with a graphite pencil just to enhance them. The back piece of the clock was embossed again with a floral embossing folder and then painted red. When dry this area was then  given a wash of black paint to take away the brightness.

The pieces of compass were cut from another Tando Creative set, this had the compass, crown and cog in.The compass pieces were cut to suit and then painted in black acrylic and highlighted with a graphite pencil.

The front of the clock was then given a wash of yellow oxide paint and this was allowed to 'run down' the piece and this gives the project a real look of old rusty metal. The front and back of the clock were then stuck together to with high tac glue.

I really enjoyed this workshop and learning lots of new techniques!


Thanks for stopping by. 
I appreciate all comments you may have on my cards.

Gill

Wednesday, 17 October 2012

Christmas Cards !

Good Morning

Today I would like to share with you a couple of cards I have made recently. For these two cards I have used Tatty Ted die cut decoupage. Although these sheets are die cut I usually go around them with my scissors as sometimes they are not quite cut as close as I like.

 For this first card I used some pale blue glittered paper with snowflakes on. Again this is from paper from my stash, I am making a concious effort to use stash I already have rather than buying more :) The silver mirri mat was die cut using a Marianne Die cut. This is a fabulous die cut and has a large flat circle in the middle which makes it very usable for so many things. The greeting was also matted onto silver mirri card.
For this second card I used some of a sheet of paper by Carol Wilson Fine Art. This time I matted the image onto a scalloped oval silver mirri card, die cut using a nestsability die. The snowflakes on the paper are already glittered and needed no more, again the message was mounted on silver mirri card.


Thanks for stopping by. 
I appreciate all comments you may have on my cards.

Gill


Tuesday, 16 October 2012

Hello there

Sorry it has been a while since my last post. Unfortunately life has got in the way.

Any way, Today I want to share with you a couple of cards I have made ready for Christmas (Shhh!).

Both these cards are 7x5" card blanks.
On this first card I used backing paper is from a pad I have had in my stash for a while (sorry don't know the make), The decoupage topper is a Forever Friends die cut one. I have shaped each individual pieces before layering them up. The topper is then layered on an white card which was die cut and embossed using the Marianne Petra Ovals die and I used the Iced Spruce distress ink to highlight the embossed areas. The card was finished off with three gold 'nailheads' in the top right and bottom left corner. The sentiment was also inked with Iced Spruce.
On this second card, I again used a backing paper from an old stack. This time I used the Forever Friends Pyramage set. Again the frame was made using white card and the Marianne Petra Ovals die. Inked the embossed areas with Iced Spruce distress ink. Three small pearl gems again in the top right and bottom left corner finish this off.

I hope you like these two cards. I enjoyed putting them together.

Happy Crafting.