Monday 3 December 2012

A Birthday card

Good morning

Today I would like to share with you a Birthday card made for a very special friend. This is a 6x6" card blank cut from pink Bazzil Bling card stock. The image is one from Lili of the Valley's Blossom die cut sheets. I have die cut this using Nesyies Label 1 and the Labels one scalloped. The flowers are Prima Hydrangea's. The backing paper is from Lili of the Valley Bonnets and Bowties paper pad. The green swirl up the right hand side of the card has been cut using a Marianne Flourish die and the one across the bottom is die cut using a Whimsy die.


The flowers were attached using silicone glue. This is a fabby card for a fabby friend.


Thanks for stopping by. 
I appreciate all comments you may have on my creations.

Gill

Sunday 2 December 2012

Inside the Secret Pocket

Good Morning

Today I would like to share with you the mini book which goes inside the secret pocket!

The book was made up from sectrion of brown Kraft Card. The book was covered with the same Graphic 45 papers as we used to decorate the envelope box.

 The kraft card was simply folded together to give lots of places to put photos, quotes or just little messages for your loved one.


Thanks for stopping by. 
I appreciate all comments you may have on my creations.

Gill

Saturday 1 December 2012

Envelope box

Good morning

Today I would like to share with you all another project from Rosemary Merry' Retreat.

This one is a box of goodies made up from envelopes. To make this we had to put the envelopes on top of each other, not straight, but in a random messyness! Why did all mine end up straight! When I want them straight, they won't go straight! The edges of the cream envelopes were inked with vintage photo distress ink.
The envelopes were stacked together with foam pads.


The middle section of the envelopes were cut away to provide a secret pocket. The embellishment on this project have been hand cut from Graphic 45 Kraft collection papers.


The blue washi tape section shows where the secret pocket is within the project.


The last picture shows a small keepsake book within the secret pocket. More about this book later :)


Thanks for stopping by. 
I appreciate all comments you may have on my creations.

Gill

Friday 30 November 2012

Anniversary Card

Good Morning

Today I would like to share with you a card I was recently asked to make for a Coral Wedding Anniversary, (35 years married).

This is an 8x8" card blank, although it doesn't show up well in the photograph, the backing card was coral coloured. The white card was then punched using a Martha Stewart Punch around the page, eyelet lace. The image is a Lili of the Valley Wedding Couple which has been coloured in using promarkers.


The flowers are by Prima as are the leaves. The ribbon tied around the spine of the card is a champagne colour. The wording on the card was typed on the computer.

I would like to enter this card into the Lili's Little Fairies Pastel Colours challenge.

Thanks for stopping by. 
I appreciate all comments you may have on my creations.

Gill

Sunday 25 November 2012

Retreat Projects.

Hi There

Today I would like to share with you one of the projects we made on last weekends retreat run by Rosemary Merry. It was fantastic !

This was a project using a wooden heart. Although it wasn't the right heart shape, this was easily altered using my Tim Holtz scissors. They are Great ! ! !

The papers are from the Beautiful Moments Range by Carta Bella. They are divine papers.
We traced aroung the heart and then cut the papers out to cover the wood front and back. We thencut up other papers from the range to embellish the heart. There was a sheet of messages, tags and sayings which were usesd for the 'Blessed' word and the 'Bird' sentiment.  The panel at the top was a journalling tag which had been cut from the papers. The flowers were die cut using the tattered florals die (I think it was :)). The smaller of the flowers were cut from cream card and a beige flowery card. Lace was attaced aroung the left hand side of the hreat, this was held in place with red line super sticky tape. The birdies were hand cut from the papers and then attaced using foam pads and then glazed using Glossy Accents. This effect looks FAB, but you must resist the urge to see if it has set, otherwise you end up with a finger mark in it :)


I hope to show you another project tomorrow.


Thanks for stopping by. 
I appreciate all comments you may have on my creations.

Gill

Saturday 24 November 2012

Winter Wonderland

Good Morning

Today I would like to share with you one of favourite projects from the retreat. 

This started life as a canvas, however we turned it back to front and made it into a frame. The edges were painted with white paint as was the inside inch or so of the canvas. 


Around the frame we then stuck watered down PVA glue and then scrunched up tissue paper. The we added a little more PVA and sprinkled Galmour Dust and some Shabby Blue frantage embossing enamel to give a little bling.

The papers are from the Echo Park, Winter Wishes range and are great for Christmas or any wintery birthdays. We cut a piece to fit just inside the frame and then cut two 'hills' from Bazzill card stock. ON the hills we dry brushed using white acrylic paint to give the snowy look.

The little houses are from Tando Creative. These were covered in the matching papers from the range and then attached to the project. 
The fence was a die cut, and the santa and sleigh were chipboard die cuts which were coloured with Charcoal ink and then given the glamour dust treatment. Although they dont show up very well on the photo I have cut put 6 trees from a coordinating paper and added them to the hills. We then die cut various snowflakes and glittered them before placing onto the frame.


Thanks for stopping by. 
I appreciate all comments you may have on my creations.

Gill

Friday 23 November 2012

Desk Calender

Good Morning

Today I would like to share with you a samll desk calender which I made for the upcoming Christmas Fair for Francis House Chidrens Hospice.


These cute little claenders are really easy and fairly quick to make. You start off with at A5 piece of coloured card and then score at 2, 4, 6cm and then at 15cm. This then folds to made the base of the calender and then is is just a case of decorating and putting a calender on it. I used the First Edition New Leaf pad and then a Simply Creative 3d Sticker flower.
Once I had worked out the measurements they were quite quick, and very effective.


Thanks for stopping by. 
I appreciate all comments you may have on my creations.

Gill

Thursday 22 November 2012

Graphic 45 Tags

Good Morning

Sorry I haven't posted for a few days I have had a poorly little boy since I got back from the retreat last weekend.

Anyway, today I would like to share with you a project I did at The Stamp Pad  last week. We made 2 tags using the Graphic 45 Nutcracker papers. The first tag was a black Tim Holtz Tag which was covered with the balck paper from the range which had 'Christmas Past ' written all over it. We then die cut the new Mariannce Clock Die in the red paper. The rosette was die cut from the stripy paper using the Tim Holtz rosette die. The father christmas came from the Die cut sheet from the range, and the small stamp was agaiun cut from one of the sheets of paper. A couple of punched snowflakes and some green satin ribbon finished this tag off.


For the second tag we used papers from Graphic 45's 'The Nutcracker ' range of papers. For this one we used a larger kraft tag. This was then backed with a cream paper from the range. We then cut pieces from the othr papers to embellish. The strips top and bottom actually ca,me from the indexing strip at the bottom of the 12 x 12" papers. The Gingerbread man and the Nutcracker were cut from a sheet of paper and then covered with Glossy Accents to give them an enamelled look. A metal corner embellishment was added on the right hand side . Again the small stamp image was cut from one of the 12 x 12" papers. The ribbons at the top of the tag started off as cream seam binding. They were sprayed with water and then inked with distress Inks.


Thanks for stopping by. 
I appreciate all comments you may have on my creations.

Gill


Friday 16 November 2012

Present bags

Good Morning

Today I would like to share with you a couple of  'paper bags' which I have altered to make gift bags for those 'hard to wrap' christmas presents.


The papers are from Kaisercraft 'Silly Season' range. The papers were punched with a border punch from Martha Stewart. The chipboard elements and journalluing blocks are from the same range. They were finished of with a red ribbon bow.


Thanks for stopping by. 
I appreciate all comments you may have on my creations.

Gill


Thursday 15 November 2012

Birthday Card

Good morning

Ooops don't know what has happend this week, Where has it gone :)

Today I would like to share with you a card I made for a dear friends birthday which was on Tuesday. I wanted to make sure that she had got the card before posting it on here.

The card is made on a 5x7" card blank. The papers are from NitWit's Bonnets & Bowties pad. The image is 'Best Friends' by Lili of the Valley. The image was coloured in with Promarkers and then die cut with Nesties Labels 2, the backing was pink Bazill Bling cut with the same die.The image was then gently inked, whilst still in the die, with Tattered Rose distress ink. The flowers are Prima No5 flowers in Blue and Pink. The green flourish at the top is a Marianne Die Tiny Flowers 2. The flourishes at the bottom are die cut from the Vines die by Whimsy Stamps. These were all die cut with my Big Shot.


Thanks for stopping by. 
I appreciate all comments you may have on my creations.

Gill


Monday 12 November 2012

Tando Creative

Good Morning

Today I would like to share with you a couple of  projects I have made using Tando Creative Wavy Gothic Arch chipboards. 
On this first one it was covered with a Graphic 45 Kraft paper with roses on. This was then inked around the edges with rusty hinge distress ink. The sentiment also came form a Graphic 45 scrapbook page and was die cut using a nestability labels shape. This was also inked with rusty hinge distress.  Using a Cropodile Big Bite I then punched three holes, two at the top for the hanging wire and one at the bottom for the dangly tassle. The cogs were chipboard, with double sided adhesive, die cut using a nestie Cogs & Gears set. Then the adhesive was peeled off and gilding flakes put on to give the metal look. 


For the second one, the Wavy Gothic Arch was painted with a metallic purple paint. The stamp is from Tim Holtz Good Thoughts stamp set. This was stamped in Black ink and then highlighted with a white pen. I then stamped a flourish stamp in black and again highlighted with a white pen. The Bird in a cage metal embellishment was then glued in place as was the metal flower. Some purple satin ribbon was threaded through the jump ring at the top and there we have a lovely hanging decoration.


I have been thinking of getting some more of these and decorating them for christmas, but not sure if I will have the time now.


Thanks for stopping by. 
I appreciate all comments you may have on my cards.

Gill


Saturday 10 November 2012

Forever Friends

Good Morning

Sorry this post is another one about Christmas :( I feel as if Christmas has gone on long enough :) But as I have a stall at Francis House Childrens Hospice Christmas Fair I wanted to make sure I have enough cards for people to buy. I just hope people like them enough to buy them.

All these cards are 7x5" card blanks as I find this is a really nice size to work on. This first one is a Forever Friends pyramage topper. This is matted onto a Marianne Oval Die which I have gently inked with distress ink. The lilac flourish paper is from an old stack, three red gems were stuck in the top right and bottom left just to give the card a bit of bling .


The same lilac paper was used on this card. The corners were rounded off with a medium corner rounder. This time the frame was inked with iced spruce distress ink. The topper is a decoupage which i layered together with silicone glue. Again red gems top and bottom.

 On this card I decided to go all out girlie. Using red cardstock for the Marianne die and the mat for the sentiment. Festive berries distress ink has been used to edge the papers and sentiment. Again red gems finish it off.

On this last card I have gone for a lilac theme. The decoupage topper was a squareish shape so I stuck to this shape for the matting and layering. I rounded the corner's with the medium corner rounder punch both on the topper and the sentiment. This time I have used lilac gems in small, medium and large, top and bottom.


Thanks for stopping by. 
I appreciate all comments you may have on my cards.

Gill

Friday 9 November 2012

A Notelet Box

Good Morning

Today I would like to share with you a fabby little box which I made last saturday at The Stamp Pad with the talented Carol W. The box was made from some fabby brown Kraft card. The piece on the top of the box was embossed with an embossing folder and then ,atted onto black card stock. The box was made from just one sheet of A4 card stock.

Inside we made a smaller embossed piece and again mounted this onto black card stock. to go inside the lid of the box. I the base of the box we used a piece of A4 card, cut lengthways, then embossed. This was then scored to strenghten it and alo to provide dividers between the notelets and give an area to put a small pen or pencil, paperclips etc.

For the wrap around the notelets we again used the same card stock and embossed this using the same embossing folder. To attach it together and cover the join, we die cut the panel on the front from a Sizzix framelits die, here. The notelets were made from A4 cream linen card stock at 3.5" square. The toppers are just squares of Graphic 45 Kraft collection paper, matted onto black card stock.


I really enjoyed this workshop, it tested my brain :) and made me do things that I may not have done otherwise.


Thanks for stopping by. 
I appreciate all comments you may have on my cards.

Gill

Thursday 8 November 2012

A Kaiser Christmas

Good morning

Today I would like to share with you a couple of Christmas cards made using Kaisercrafts Just Believe range. 
Ths first card is a 6 x 6" card blank in red card. The background paper is cut form the 12 x 12" paper. We then cut a length od red paper and punched it with a scalloped border punch. We then stuck a length of green cotton lace onto the paper. The sentiment was cut from a sheet of the papers which had smaller die cuts on. Between the ribbon and the die cut we cut a flourish frame from the green paper and we used a Marianne Flourish die. A cream ribbon bow and a snowflake embellishment finish the card off. Sorry the photo really does not do this card justice.


This second card also uses the same paper pack. This time we used a 5x7" card base. The bottom of the card used the pale blue paper and then for the top of the card we used the red flourish paper. One thingh I love about Kaisercraft papers is that on the reverse of the index strip on the bottom of the papers they put a matching design. This is what has been trimmed and used to cover the join between the two papers. The topper was cut from the die cut sheet, snowflakes punched in the corner and then matted onto pale blue pearlescent card. The village scene on the bottom of the card was cut with another Marianne die. Although it doesn;t show very well on the photo, I used a quickie glue pen on the roof of the buildings and then sprinkled Glamour Dust over the top as a bit of snow.I think the hardest part on this card for me was tying the cream bow, it just would not go right!


I hope these cards have given you some inspiration.


Thanks for stopping by. 
I appreciate all comments you may have on my cards.

Gill

Wednesday 7 November 2012

Birthday Card

Good morning 

Today I would like to share with you a paper bag birthday card. 

First of all we took the bottom base of the bag and folded the corners in to create a 'tag top' effect and creased these folds well. Then we took the open edge of the bag and folded it in towards the crease where the bag bottom is, again this was creased well. The papers we used to cover this card are from Kaisercraft Charlottes Dream collection. When we covered the 'bottom' of ther bag the paper was cut square and then the corners were folded in on the paper bag. We pounched a small circle from Kraft card ans a scalloped circle from the patterned paper and attached these with a pink brad.

On the inside of the card we matted another sheet of the pink paper and then attached a sheet which had been punched with a border punch. This was only attached on three sides to reate a pocket. The tags were die cut with the sizzix scalloped tag die. On the left hand side we punched half a circle out and used this part of the bag to create a pocket which we put another tag in, or you could write a secret massage :)

The Birdcage stamp is from a fantastic range of stamps by Hampton Art. Gwen currently has these on offer in the shop for £16.00 for 16 wooden stamps. They are amazing value and stamp really well. Have a look here.


Thanks for stopping by. 
I appreciate all comments you may have on my cards.

Gill

Monday 5 November 2012

Mini fold up book

Good morning 

This is a project designed by the fabby Carol W from The Stamp Pad in Saddleworth. We started off with sheets of 12 x 12" patterned paper however we then cut them down to 8x8". So you could use those 8x8" paper stacks that we all have lurking around in our stash.


One of the sheets was then cut in half horizontally. The first sheet was then folded in half both horizontally and vertically so that you end up with 4 equal squares. The second sheets are then attached to the top right hand side and the bottom left hand side, this then enables the book to be folded up. You can then decorate to your hearts content, but remember not to use thing too bulky as it won't close up.


To make the little pocket to put the mini book in we used another sheet of paper from the same range. One thing to remember is that if your paper has a direction on it be careful as you don't want anything upside down! This was simply creased, folded and the edges stuck together.

I loved this workshop and my aim is to make a few more of these fab books. They would be great to give as presents at Christmas to grandma's with picture of their little angels in!


Thanks for stopping by. 
I appreciate all comments you may have on my cards.

Gill


Sunday 4 November 2012

Paper Bag Cards

Hello there

Today I would like to share with you a couple of paper bag cards which i made during a fabby workshop with Gwen at The Stamp Pad.  I have to admit that I had no idea what a paper bag card was, I had heard of paper bag books before but not cards.

This first card is simply a paper bag with the block bottom on the right hand side, this was stuck down. A green mat on this and then a piece of blue patterned paper on the other half of the bag. A sentiment was then stamped onto the same paper as the left hand side and stuck at a jaunty angle on the front (because I couldn't get it straight :) ) The striped ribbon was stuck across the front and then the ends were tucked into the fold of the bag. Into the bag we put a large tag, this could hold secret messages, a gift voucher or even a promise for you to do something for the recipient (free babysitting etc)

On this second card the bottom flap was folded upwards and stuck only on three sides to create a pocket. The orange stripy paper was then attached. The papers are from Kaisercraft, the thing I love about Kaiser papers in that on the back of the index strip they put a coordinating pattern, in this case the red strip with white stars. The transportation paper was trimmed to size and stuck to the top  part of the bag. Using a circle punch we cut a notch out to enable the recipient to easily pull the tag out. Again this could just be a place for your message or it could be a promise certificate. The orange ribbon was attached and the ends tucked inside the bag.

I really enjoyed making these cards and will never look at a paper bag in the same way again :)


Thanks for stopping by. 
I appreciate all comments you may have on my cards.

Gill

Saturday 3 November 2012

Warren Christmas

Hello

Today I would like to share with you some cards I have made using die cut shapes from Craftwork cards with Warren the Rabbit. The die cuts come on a variety of shapes. I have used a variety of card blanks. A6 and square.


As I felt that some of the die cuts were a little too 'white' on the cards I stamped the edges with a flourish stamp using the same distress ink as the one I used to ink the edges with.


Thanks for stopping by. 
I appreciate all comments you may have on my cards.

Gill


Thursday 1 November 2012

Indigo Blu

Good Morning 

Today I would like to share with you two cards I recently made on a Workshop at The Stamp Pad. The workshop was run by Julie Dawson design team member for Indigo Blu. In this workshop we used two of the Indigo Blu Christmas Stamp plate.

This first card is a 5x7" card blank. The white background was inked around the edges, leaving the middle white, with Peeled Paint distress ink. In the top right hand corner we used the wreath stamp inked with Forest Moss distress ink. The baubles were stamped in encore Gold ink.
The Bows were stamped onto white card with versamark and then covered with Frantage aged green embossing powder. They were then cut out and then the white areas inked with peeled paint ink. We then used some frantage embossing powder and used then encrusted jewel technique where we added mica flakes, glass glitter and other bits and pieces into the molten embossing powder. This is on the bottom left hand side of the card. We then put a Merry Christmas peel off on the green ribbon across the bottom of the card. These stamps were from the Wreathed in Smiles Stamp Plate from The Stamp Pad


For the next card I used a A5 landscape card blank. The mother and baby image on the right hand side is from Indigo Blu Joy to the World Stamp Plate. We stamped her with versamark onto cream card and then used Aged Bronze embossing enamel. Also on Cream card I stamped the verse from the Joy to the World set.Both these were then matted onto gold mirri card. The verse was then layered onto Black velvet paper which had been die cut using nestabilities Labels 22. The background card is a square of white card which has been randomly stamped with the pine branch from the Wreathed in Smiles stamp plate. The stamp was inked up with forest moss distress ink and then stamped a number of times without reinking in between each impression. This gives a fabby amount of  colour variation.
Both panels were then matted onto black mirri card and then attached to the card blank.


Thanks for stopping by. 
I appreciate all comments you may have on my cards.

Gill

Wednesday 31 October 2012

Free papers from Magazine

Good Morning

I hope you are all well and not too cold today. Today I would like to share with you a couple of Christmas Cards I have made using the free Forever Friends decoupage and paper stack with came with this months Papercraft Essentials. Now I have to confess when I get free papers , toppers and things with magazines I tend to put them aside 'for later'. How many of you do the same?
But with this pack I just had to have a go at making the toppers up and then making actual cards with them! The stack gives you 10 patterned papers and 2 designs each of four decoupage designs.

This first card is a 6x6" card blank. the decoupaged topper was placed onto white pearlesent card and then onto red card stock. The corners were then trimmed with a corner punch. I  then used the green swirly paper down the left hand side and the cream holly paper on the rest of the card. This was the matted onto red card stock, but if like me you cut the papers a bit too short, I wrapped a piece of green satin ribbon around the bottom ! The holly spray was cut with a Marrianne Die and then I added red holly berries with Xmas Red Stickles. Three red gems top left and bottom right of the card.


For the second card I again used the green swirly paper. This time I cut a square of the red checked paper and edged it with Festive Berries Distress ink. The decoupage topper was then put on white card and then onto red card. I rounded the corners with my small corner rounder punch.  A small snowflake peel off in each corner  added a bit of bling to the card.


I hope you enjoy using your freebie goodies as much as I have.


Thanks for stopping by. 
I appreciate all comments you may have on my cards.

Gill


Tuesday 30 October 2012

Lili of the Valley

Good Morning

Today I would like to share with you the images which we coloured during the fantastic workshop with Bev Rochester at Lili of the Valley on Saturday.

The first image was Aimi with Lantern. When I first saw the image I have to admit my heart sank, when I saw all the small areas of different colours on the dress, flowers and her fan. I didn't see just how I could get an image as good as Bev had. However with her expert teaching and taking it one step at a time this is my finished result. Please ignore the scribbles around the edge of the image, I was trying to change the colour of my promarker fine nibs :) 


This second image is Teddy with Robin. I didn't think we would actually get round to colouring this image in as Aimi took so long to finish. The little bear was coloured in browns and then the robin was coloured in. He is relatively quick to colour and such a cute image.When we had finished colouring him in with Promarkers we then went over with prisma colour pencils and used a blending stump and sansador. I can't tell you how much this last short process changes the images and makes them so much more professional looking.
If you ever get the chance to attend one of Bev's workshops GO GO GO.


I will try and get these images made up into cards soon :)


Thanks for stopping by. 
I appreciate all comments you may have on my cards.

Gill


Monday 29 October 2012

Massive Crafting Session!

Good Morning

Toady I would like to share with you a few of the Christmas cards I made during a marathon session last Friday.  I will be attending a Christmas Craft Fair in Stockport in November and I am selling some of my cards. The Craft Fair is to raise money for Francis House Children's Hospice.


I found in my stash a Lisa Bearnson Holiday Card Kit, which I bought quite a few years ago and have never used. So as each card was in individual bags, it was just a case of putting them all together. There were six of each design so I sat all afternoon and I made up 60 cards. When I made the first card up to the instructions I then tweaked them to make them my own, and added the essential glitter! Even if they only sell for £1 each the money will go to a very good cause.


Thanks for stopping by. 
I appreciate all comments you may have on my cards.

Gill

Saturday 27 October 2012

Christmas Again

Good Morning 

Today it's back to Christmas cards. 

For this first card I have used a 7x5" card blank.  The paper, I think, is from a DO Crafts paper stack, is a gorgeous lilac swirly paper. The topper is a Forever Friends Die cut Pyramage which I have mounted onto white card which has been die cut with Marianne Die, Petra Ovals. Then whilst still in the die, I have gently inked the embossed areas with Festive Berries Distress ink. The sentiment if from the Die cut pack, again inked on the edges with distress ink. Three red gems top right and bottom left add that touch of bling without being over the top.


For this second card I have used another paper out of the same pack. This time a white paper with shades of purple and lilac snowflakes on it. This topper is a die cut decoupage from the same pack. I have layered this onto purple Bazzill card, as I have with the sentiment. Again I have added gems which had been coloured with alcohol ink to match the colours of the card. This time I graduated the sizes of the gems.

Thanks for stopping by. 
I appreciate all comments you may have on my cards.

Gill

Friday 26 October 2012

Seasonal Cards

Good Morning

Today I would like to share with you a few more seasonal cards.

This first card was made using the First Edition Desert Bloom paper stack. This time I have used the papers with the pinkish tones in them. This was very simply layered with burgandy card stock with some of the layers having the corners trimmed with a corner inverter punch. A length of burgandy satin ribbon was tied around the right hand side of one of the panels. A glitter sticker from the Simply Creative range was stuck to the top panel. As I couldn't find gems to match this colourway I simply used clear gems and coloured them with alcohol inks.


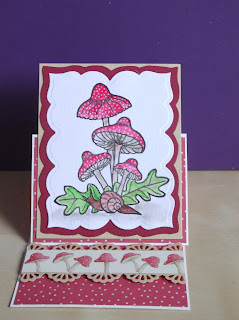
The card was made as an Easel card. The papers were taken from the Neighbourwood paper range. The stamp is a Clarity Stamp which was coloured by watercolouring with Marvey Le Plume pens. The white spots on the toadstools were then added using a white gel pen. The image was then die cut using nesties Labels 23 and then layered onto a piece of deep red cardstock. The stopper was made from beige card and the edges were punched using an EK Success border punch on both side of the card, this was attached using foam pads to raise it up off the card and help to stop the card from falling flat.


Thanks for stopping by. 
I appreciate all comments you may have on my cards.

Gill