Monday 14 February 2011

Forever Friends

Hi there

Well I have been working hard this weekend making cards for all occassions. Today I am going to show you a card I made for my Father-in-Law's birthday.
I have used the sketch from Waltzing Mouse #34, only this time I have turned the sketch sideways.
I have used a 8x6" scalloped card blank. The green and Blue papers are from the Planes and automobiles collection by GCD. The ribbon was some satin, wrapped round and a knot tied on it. So much easier than a bow. The die cut is Nesties labels 10, cut through my Big shot. Quite a simple card, but very effective.

Just hope he likes it!

Sunday 13 February 2011

Waltzing Mouse Sketch 34

Hi there

Well I have used the sketch from Waltzing Mouse to make a card for my Nan's 80th Birthday.

I have used a 7x5" scalloped card. The backing paper is from the Jolie Chocolat range by SEI. The flowers are by Prima. The Nestie die cut is Labels 10, it has been stamped using the Waltzing Mouse Very Vintage 10 stamps in Victorian Velvet distress ink. The leaves are cut using the new Marianne Dies, These have been cut on my Big Shot. All papers, flowers and nesties can be purchased from The Stamp Pad in Saddleworth.

Hope you like this, please feel free to leave a comment.

Tuesday 8 February 2011

Mojo Monday 177

Hi There

I have made this card using the weekly sketch from Mojo Monday no 177.
The sketches are really easy to follow, and can help when your mojo goes walkabout!

This is this weeks sketch and here is my go.
The background is Bazzill Bling in raspberry. The papers are from the BoBunny Jazmine range. A circular sentiment, inked with Victorian Velvet distress ink and some purple gems finish this card off. As you can see the paper used is only small pieces so you can use up your scraps before using a full sheet. As usual the papers, gems and even the distress inks were bought from the Aladins cave which is The Stamp Pad.

More Craftwork Cards

I thought I would show you the other cards made on the workshop at The Stamp Pad, using Craftwork Cards stash.
This one was made using a 6x6 card blank, covering it with the fabby pink roses paper. Then taking the paper doily and scoring it just off centre, the smaller section was attached to the back of the card blank so that when it folded aroung the front it acted as a closure just sliding under the sentiment which was stuck down using foam pads to give it  height. Another flower was put together and stuck on the front.

This card was made using the 'notch' card blanks. The paper was cut to size and attached to the card blank. A strip of pink across the middle, all edged with stickles. Then a panel of the beige paper, two flowers and a circle sentiment stuck onto a flower shape finishes off this card.

Sorry about the poor quality of pictures my camera doesn't like too much bling!


Monday 7 February 2011

Been Awol

Sorry I haven't posted for the last few days, I have been laid very low with a nasty bug!

Before that I did a fabby workshop at The Stamp Pad, using the gorgeous Craftwork Cards Stash. We made 4 cards, although 1 of mine appears to have gone astray!
This is a DL card simply covered with the fabby paper in pink and cream with Gold foiling (as you can see from the flash of the camera!). The Die cut square and flowers are all available along with the card candy! These were simply layered up. Very simple but very effective! There is also card candy down both sides of the card.
For those of you who haven't come across card candy, it's fantastic! I think originally it was waste from another product, but is now manufactured in so many colours and you get hundreds in a bag, and it is very reasonablely priced. They are like brads with no legs! A small square pad or blob of silicone and your away.

Happy Crafting

Thursday 3 February 2011

Seaside House

Well a promised I am going to show you my Wooden House, which I have altered with a seaside theme to go in the bathroom. I picked some gorgeous bits and pieces up from The Range the other week. Ther was a Sign which said 'To The Beach', an old fashioned lighthouse and an wooden boat which holds three tea lights. Perfect for lighting to relax in the bath and read a good book. But one of the walls looked very bare and 'not quite right'. After I altered the wooden house last week I bought another house. I then set about altering this to fit in with the sea theme for my bathroom.

It was sponged with a pale blue acrylic paint and then washed over with a darker blue. I have added some raffia to look like sailors netting, my UTEE duck, starfish and swirly shell. I used papers which look like sand and also one which was just pictures of shells on the beach, both of which I bought from The Stamp Pad. I have also added some pieces of blue swirly ribbon to represent the sea. Now I just need some photos of my boys to finish it off.

Wednesday 2 February 2011

Melt Pot

Well since my workshop with Kay Halliwell-Sutton at the Stamp Pad, I have decided to get my Melt Pot out and play!
I have recently ordered some silicone moulds  from that well know auction site. They are meant for cake making and decorating, but as you know us crafters can use anything!

As you can see from the picture, I have moulds which make a Duck, a butterfly, flowers and a swirly seashell. These mould are fabby, The duck and butterfly mould also has a turtle, monkey face, penguin and fish.  The shell mould has a starfish, the swirly shell an ice-cream cone shaped shell and a clam , mussel and another shell shape. I have a mould which does 3x stars, 3x flowers and 3x hearts. The last mould, which I haven't used yet has banana's, a pear, strawberry's,  apple,  cherries and another fruit I am not sure of, it may be easier to tell when it is made.
I had such a fabby time pouring the UTEE into these moulds and experimenting!

I have used the seaside themed items for another project I will show you when it has been finished!

Happy Crafting

Tuesday 1 February 2011

Workshop with Kay

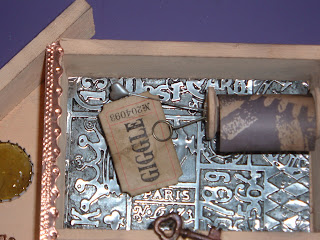
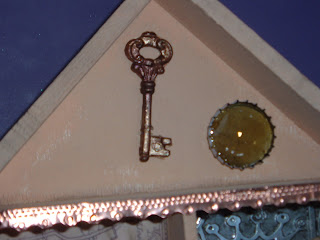
Just thought I would share with you the project I did last weekend at The Stamp Pad. The workshop was being run by a very talented lady Kay Halliwell-Suttton. We altered a Wooden House.


The house was painted, well dry brushed, using acrylic paint and then decorated. We then painted wooden embellies and decorated them.


We embossed some metal with a folder throught the Big Shot and then distressed it with paint.


 We also used a 'Melt Pot' to make some embellies from UTEE. We made Keys from a mould and then poured molten UTEE into bottle tops and set buttons and other bits into the UTEE.