Friday, 18 October 2013

More Lili of the Valley

Good Morning

Today I would like to share with you another project I made during my recent day out at Lili of the Valley.

This is a hanging decoration which could be altered to suit any time of the year.


The top section was a 6x6" Kraft card base. 
Covered with Tartan type paper from the Classic Christmas Paper Pad, which was matted onto Red card
A Doily was added to the centre.
Then a Window shape was cut with a Memory Box die.
Behind this was put a piece of red card which had punched along the edge. 
This gives the effect of curtains or blinds.
The bottom of the window was then embellished with Holly leaves and Pine branch die cuts.
The pine cones were made from a rolled flower die in Kraft brown.
Some red Stickles for holly berries, and there you have section 1.


  This was made on a 4x4" Kraft card base.
We then used a LOTV Die cut topper. 
The topper was matted onto red card.
Then onto the Kraft brown base.
I then used a quickie Glue pen and some Glamour Dust to highlight the snowflakes.
Also the snow on the ground.


 The bottom of the Decoration.
Simply a 2x2" piece of Kraft brown card.
Using the same tartan like paper matted onto Red card.
A LOTV Christmas sentiment stamped onto Kraft card. 
Matted onto a red scalloped circle.


 To join them together I used red ribbon.
When the ribbon was in place I then stuck same sized kraft brown card over the back.
This is to cover the ends of the ribbon and also makes it a bit more secure.


Thanks for stopping by. 
I appreciate all comments you may have on my creations.

Gill

Thursday, 17 October 2013

A Hobby House Christmas


Good morning 

Today I would like to share with you a couple of cards I have made using the Hobby House Die Cut Toppers Sheet.


Once again I have used 6x6" card blanks. 
I tried to keep this simple with just using the blue snowflake papers.
But somehow this didin't look quite right, so I matted everything onto red card.
The topper looked a bit stark white so I dug out a snowflake stamp and used second generation images around the edge of the topper.
I layered the topper ontop of a circle doily for added interest.
Some red gems in each corner and red Ric Rak ribbon.
I also used a strip of the paper matted onto red again down the left hand side.


Again this is a 6x6" card blank base.
The background paper is from an Artoz Winter paper pad.
Just as in the card above, I have matted onto red card.
Added a Doily for interest.
Red gems in the corners and then also on the strip across the bottom.
Again second generation stamped snowflake on the topper sheet.


Another card using the same ideas as above.


And again, well I had the papers and red card out !
I was great how after the first card the rest all just seemed to come together very quickly.

Thanks for stopping by. 
I appreciate all comments you may have on my creations.

Gill

Tuesday, 15 October 2013

Lili of the Valley Day Out

Good morning

Today I would like to share with you a couple of items I made on a recent trip out to Lili of the Valley.
My wonderful friend and I went over to do an all day workshop with Dawny P from their design team.


This first project is a decorated paper bag. 
This is ideal for those Christmas presents which are just too awkward a shape to wrap up !
This is a great way to also use up those bits of paper you were keeping. 
You can die cut them to embellish the bag.


This next is an 8x8" card blank.
Now this isn't a size I normally make as I find them a bit big.
But again this was made using up, dare I say, left overs from other cards. 
The Topper from a Lili of the Valley die cut sheet. 
Then strips of paper off cuts with chevrons cut in the bottom.
A sentiment and some bling finish it off.

Thanks for stopping by. 
I appreciate all comments you may have on my creations.

Gill

Wednesday, 9 October 2013

Flip Flop Album

Good Morning

Today I would like to share with you a projectI have made using a Flip Flop album from Kaisercraft.


This is the book made up, Although I still need to find some photos to put in it.
The three holes are pre done in the top shape so enable you to thread ribbon or whatever through.


This is the front of the pages


And these are the back. 
All I need now is some photos to go with it :)

Thanks for stopping by. 
I appreciate all comments you may have on my creations.

Gill

Tuesday, 8 October 2013

Christmas Post

Good Morning

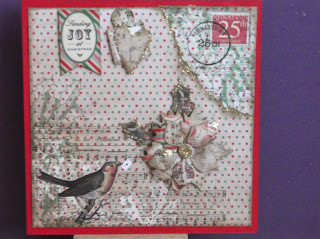
Tpday I would like to share with you a couple of cards made during last week workshop at The Stamp Pad. We were using the wonderful 'Chrsitmas Post' kit from CraftworkCards. Now I don't need any more Christmas papers, but want? Well that is another story :) These are gorgeous papers.


This first card was quite simple to make yet very effective.
A 6x6" card blank matted with a sheet of paper from the kit.
The baubles were die cut from the patterned paper and then stuck back to back to create a 3d effect.
 The tag was from the die cut sheet in the pack.
Then some Card Candi top left and bottom right .
Some ribbon and there you have it :)


Again the card was made using  6x6" card base.
This time we trimmed about 2cm off the right hand side.
Behind this we stuck a strip of patterned paper inside the card.
The it was simply two strips of the patterned paper. 
Cut into a 'V' at the botttom.
Then the die cuts were added and layered up.
I then used glamour dust to brighten up some of the pieces.


This last card was also a 6x6" card base.
We took a 5 3/4" square of the birdy patterned paper, and toen the top right hand corner off.
Beheind this we placed a square of paper with the stamp and postmark on.
The flower was made using the die cuts in the pack.
Then we added some more of the Die cuts from the pack.
Added glamour dust to give it sparkle and there you go.

Thanks for stopping by. 
I appreciate all comments you may have on my creations.

Gill

Sunday, 6 October 2013

A Christmas Mini Book

Good Morning

Today I would like to share with you a Mini book I made, (from scratch! )


This is the front of the mini book. 
The top and bottom flaps are held together with small magnets, to stop it opening when you don't want it to.
The papers are from the new Christmas Kaisercraft range.


This is the inside of the top flap.
It holds a message and a tag for you to write on or add a picture to.


This picture shows the bottom flap.
This has a pocket which hols a number of tags to write on or add decorations to.
The page has a thin lift up section so you can put a secret message, or a photo which you don't want everyone to see :)


When you open up the first page you have another tag in a pocket. 
Then you have space for a photo of a loved one.


Underneath that page in another which opens out to store two more photos.


Underneath this is space for two more photos or messages.


As we open the last page we reveal a pocket with two tags in. 
Either for more photos or messages.


Another pocket, and more tags.
On the left you can see the frame mat ready for putting a special photo in or special message.

Thanks for stopping by. 
I appreciate all comments you may have on my creations.

Gill

Saturday, 5 October 2013

More Autumn

Good Morning

Toady I would like to share with you another couple of Autumn inspired cards. After making the card for the Wild Orchid challenge I carried on and made another two :)


This first one uses one of the papers which had a gorgeous sunflower up the side of it.
I decided that I couldn't cover the design up so I used a portrait topper.
Mounted the topper onto Kraft brown card, inking all the edges.
Then I used some stardust Stickles on the sunflower and leaves.
I am really enjoying this colour combo at the moment.


For this second card I again kept it simple.
The paper was so gorgeous I didn't want to cover it up.
Again another Hobby House topper by Elisabeth Bell.
Backed onto Kraft brown card.
Glitter on the flowers and leaves and there you have it.

Thanks for stopping by. 
I appreciate all comments you may have on my creations.

Gill

Friday, 4 October 2013

Cute Christmas Cards

Good Morning

Today I want to share with you some Christmas cards which I started making on my Summer holidays!
Well what I mean we went to Wales for a week and I took some Craftwork Cards topper and my Promarkers with me. So when hubby and my boys were watching a film in the evenings I sat and coloured.


This first one was really easy to colour in. gold for the stars.
Some pale blue for the ice sheet.
Little bits of pale grey for the polar bear and pale pink for his ears and paws.
This was then quite simply matted and layered with foiled paper.


This second card was also coloured in the sun!
I decided to go quite bold and bright with this snowman. 
The snowballs have all been glittered with glamour dust.
Straightforward matting and layering with white card. 
The strip down the left hand side was made using the offcuts of the papers.
A circular sentiment, matted onto a scalloped circular blue paper.
Simple but effective, and great for the kids.

Thanks for stopping by. 
I appreciate all comments you may have on my creations.

Gill

Thursday, 3 October 2013

Classy Christmas

Good Morning

Well as promised, today I am going to show you the last card we made on the Christmas Card workshop last week at The Stamp Pad.

This one was probably the one I thought I was going to struggle the most with, if I am being honest. But it is the one I have fallen in love with the most.


For this card we stated off with a 7x5" card blank which we used landscape.
The postcard image was stamped onto white card.
We then colourd in the houses, trees, holly and berries with watercolour pencils.
We then added some blue where the snow was lying.
The image was then gently inked around the edges with distress inks.
This was matted onto some red patterned paper, which had had the edges distressed.
This was then matted at an angle onto some green patterned paper, again with the edges distressed.
On the corner, top right and bottom left was added some frantage and then gently heated from underneath, this is so the frantage powders didn't all fly away before they melted.
When sticking the green paper down, I didn't stick two of the corners and these have curled up. Which I quite like the effect of.
The card blank was also inked with the distress ink so it all tied together.


Thanks for stopping by. 
I appreciate all comments you may have on my creations.

Gill

Wednesday, 2 October 2013

Autumn Colours

Good Morning

Well the mojo is back and working !


This card was made using a 6x6" scalloped card base.
The paper is from a BoBunny paper pad called Forever Fall.
The image is from a die cut topper sheet by Hobby House.
I rounded the corners from the topper and then matted it onto Kraft card. 
The image, mat and papers were all inked round the edges with Distress Ink.
The flowers are from Wild Orchid,
Not sure if the bronze pearl sprays show up very well on the photo.
I love this image, she is so cute, and coloured better than I could!

I would like to enter this into the following challenges :-
Wild Orchid Challenge - Inspired by Autumn
Crafty Little Fairies - Autumn Colurs

Thanks for stopping by. 
I appreciate all comments you may have on my creations.

Gill

Tuesday, 1 October 2013

Awol Mojo

Good Morning

Sorry I have been sporadic in posting recently, I seem to have misplaced my crafy mojo :(

So to try any revive the said mojo, I have been to a Christmas Card workshop with the talented Gwen at The Stamp Pad in Saddleworth. Well I'm not sure what she did, but my mojo has come back :) Thank You.


For this first card, we used a 6x6" square card blank. The papers came from one sheet of double sided paper, great trick if you want your papers to match!
The stamp is from an InkadinkadooChristmas set.
This was stamped and then embossed with some frantage embossing powder.
This was on some card which had been die cut using Nesties Labels 4 (Still a great favourite)
The holly flourish in the top right hand corner is a Cherry Lynn Die, as we didn;t have the right colour card, we used white pearl card and then coloured it with Distress inks.
A few red gems for the Holly Berries, and you have a simple yet stunning card.


For the second card we used a new Stampendous Snowman and friends stamp.
He and his friends are divine! Loving colouring in at the moment.
The 'Merry Christmas' sentiment is from an Inkadinkadoo set.
Snowman was stamped and then coloured in,
To get teh arched top to the image, we placed a circle nestie on the image, but only cut half way.
Some blue glitter starry card on the top half of the card.
Then at the bottom we tore four strips of card to create the snow drifts.
The back two were stuck flat to the card, then we stuck snowman on.
Then the front two were stuck on with foam pads. We then glittered the top edges.

Call back later in the week for a look at the last card from this class. 

Thanks for stopping by. 
I appreciate all comments you may have on my creations.

Gill